Multi-Shop / Staff Management
Menu: Admin → Shop and Admin → Staff
This is a new feature. One Bawas organisation can run more than one shop. Staff can be assigned to one or more shops, enter their default shop at login, and can switch shops from the top bar after login. Sales, purchases, quotes, returns, receipts, stock, and logs follow the shop that is currently selected. Sales reports can include one or more shops using a Shop filter.
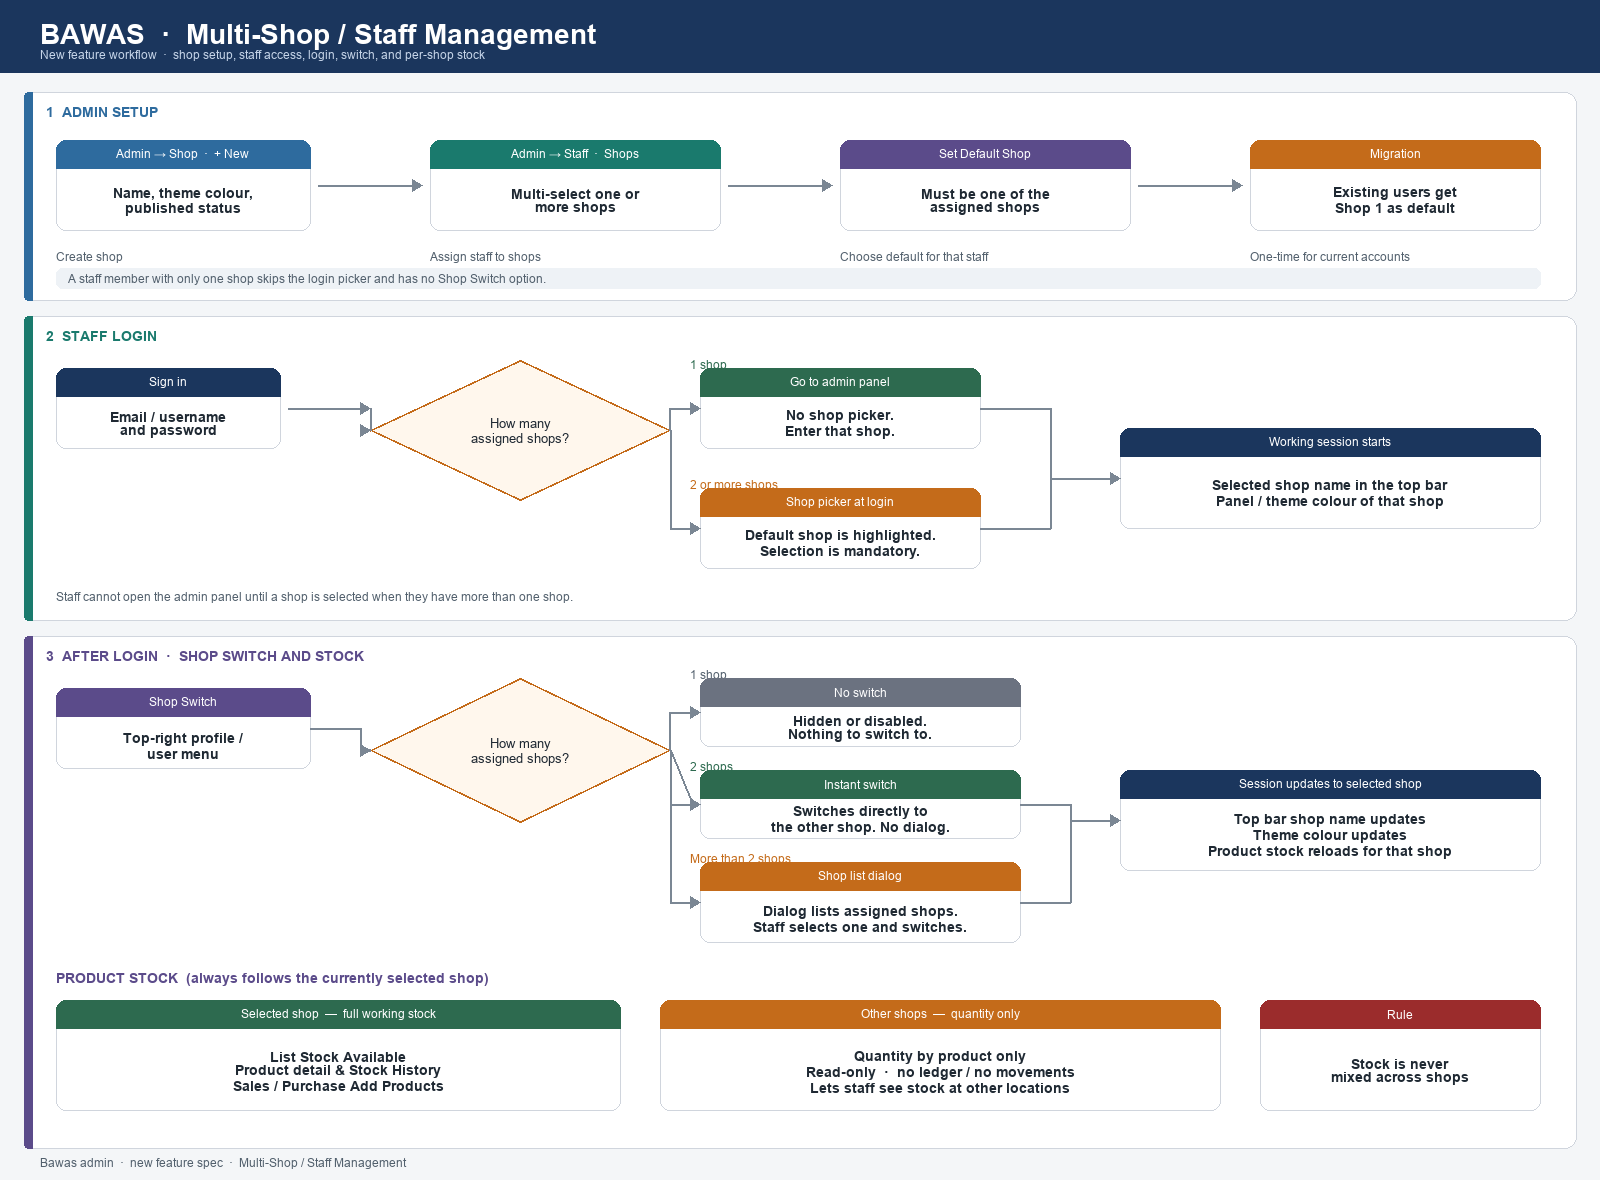
Admin creates shops and assigns them to staff. At login, staff enter their default shop (or their only shop). After login, Shop Switch is hidden (1 shop), instant (2 shops), or a dialog (3+). Working stock and transaction lists are always the selected shop; other shops show stock quantity only. Reports can filter by one or many shops.
Overview
Each shop is a separate operating context: its own name, theme colour, print address, product stock, and transaction documents. A staff member works in one selected shop at a time. That selection drives the top bar, panel colour, stock figures, and which invoices / purchases appear in lists.
Shop 1 (or your organisation’s first / default shop, for example Bawas) is the default shop for all existing users after this feature is enabled. Older documents are kept under that shop so nothing is lost.
Purpose
Let administrators open additional shops, give staff access to the shops they work in, keep each shop’s sales and stock separate, and still run reports across one or more shops when needed.
Features
- New shop creation under Admin → Shop.
- Billing address and Address (for printing) set separately on each shop.
- Multi-select shop assignment on each staff record (one staff member can belong to many shops).
- Default shop on the staff record; existing users are set to Shop 1.
- Login opens the staff default shop (or the only assigned shop). No mandatory picker.
- Shop Switch from the top-bar shop chip and the profile / user menu after login.
- Selected shop name shown as a chip in the top bar.
- Panel / theme colour follows the selected shop.
- Product stock is shown for the currently selected shop; other shops show quantity only.
- Transaction lists (Sales, Purchase, Quote, Returns, Receipt, and related screens) show only the selected shop’s records.
- Stock Transfer moves stock from one shop to another (Inventory → Stock Transfer).
- Sales reports include a Shop multi-select filter (choose one shop or several).
New Shop Creation
Menu: Admin → Shop
Use + New to add a shop. Each shop has a name, billing address, print address, theme colour, published status, and a default flag used when assigning staff.
Shop fields
| Field | Detail |
|---|---|
| Shop name | Required. Shown in the top bar chip and switch dialog |
| Billing address | Optional. Internal / billing use for that shop |
| Address (for printing) | Optional. Shown on invoices and printouts when working in that shop |
| Theme | One of 4 predefined themes (Navy Blue, Teal, Forest Green, Royal Purple). Sets top bar, panel header, and button colours |
| Published | Unpublished shops cannot be assigned or selected via Shop Switch |
| Default shop | Shop 1 is the organisation default. Existing users are assigned to it |
Create a shop
- Open Admin → Shop.
- Click + New.
- Enter the shop name and choose a theme from the dropdown (Navy Blue, Teal, Forest Green, or Royal Purple).
- Enter Billing address if needed.
- Enter Address (for printing) — this is what appears on Sales / Purchase / Quote prints for that shop.
- Set Published.
- Save. The shop is then available in the Staff multi-select.
Keep Address (for printing) filled for every live shop. If it is empty, prints fall back to the company print address in Admin → Settings. Billing address and print address are separate so each branch can print its own contact block.
Staff – Multiple Shop Access
Menu: Admin → Staff
One staff member can be assigned to one or more shops. On the staff create / edit form, Shops is a multi-select. Assign every shop that person is allowed to work in.
Assign shops to a staff member
- Open Admin → Staff.
- Create a new staff member or edit an existing one.
- In Shops, select one or more shops.
- Choose the Default Shop from the shops you selected (see below).
- Save.
A staff member with a single shop has no Shop Switch control (there is nothing to switch to).
Set Default Shop
- Existing users: after this feature is enabled, every current staff account is assigned Shop 1 as both their shop access and their default shop.
- New / edited staff: when configuring staff access, choose a Default Shop from the shops assigned to that person.
The default shop is the shop loaded at login when the staff member has more than one assigned shop.
| Rule | Detail |
|---|---|
| Default shop required | Every staff member must have exactly one default shop |
| Default must be assigned | The default shop must be one of the shops in the staff multi-select |
| Existing users | Migrated to Shop 1 as default |
Staff Login
Menu: Sign in (before the top navigation appears)
After credentials succeed, the session always opens a shop — there is no mandatory picker screen.
Login behaviour
| Assigned shops | What happens after credentials succeed |
|---|---|
| 1 shop | Log in directly to that shop |
| 2 or more shops | Log in directly to the staff default shop (or the first assigned shop if no default is set). Use Shop Switch afterwards to change |
Sign in
- Open the Bawas admin URL and enter credentials.
- Continue into admin. The top bar shows the active shop name and its theme colour.
Shop Switching After Login
Use the shop chip next to the user name, or Switch Shop in the top profile / user menu.
Switch behaviour
| Assigned shops | Clicking the chip or Switch Shop |
|---|---|
| 1 shop | Chip is not clickable; menu option is hidden |
| 2 shops | Switches directly to the other shop. No dialog |
| More than 2 shops | Opens a dialog listing the assigned shops. The staff member selects one and switches |
Switch with 2 shops
- Click the shop chip, or open the profile menu → Switch Shop.
- The session switches to the other assigned shop immediately.
- The top bar name and theme colour update.
Switch with more than 2 shops
- Click the shop chip, or open the profile menu → Switch Shop.
- In the dialog, pick a shop from the assigned list.
- The session switches to that shop.
- The top bar name and theme colour update.
The current shop is indicated in the dialog; selecting it simply closes the dialog.
Shop Display
After login (and after every switch):
- The selected shop name is shown as a white chip in the top bar (theme colour on the left border).
- The panel / theme colour follows the theme colour of the selected shop so it is obvious which shop is active.
Sales, purchase, inventory, and related lists in that session apply to the selected shop only.
Documents and lists per shop
When you are in a shop, list screens show only that shop’s documents. New records are saved to the currently selected shop.
| Area | Behaviour |
|---|---|
| Sales | List and new invoices for the selected shop only |
| Purchase / Purchase Order / Purchase Return | Same — selected shop only |
| Quote | Same — selected shop only |
| Sales Return | Same — selected shop only; invoice picker shows this shop’s sales |
| Receipt | Same — selected shop only; pending invoices from this shop |
| POS | Open / suspended POS for the selected shop |
| System Log | Defaults to activity for the selected shop |
Switching shop reloads these lists for the new shop. Customers and suppliers remain shared across shops.
Product Stock
Stock is per shop. The product screens follow the shop that is currently selected.
Currently selected shop
- Show full product stock for the selected shop (list Stock Available, product detail, Stock History).
- Stock movements (purchase, sales, adjustments) for this session belong to this shop.
Other shops
- Do not show the other shops’ full stock ledgers as the working stock.
- For each product, display only the stock quantity held at those other shops (quantity by product, read-only).
- Use this so staff can see how much of an item exists at another shop without operating that shop’s stock.
Product stock display
| Where | Selected shop | Other assigned shops |
|---|---|---|
| Product list Stock Available | Quantity for the selected shop | — |
| Product detail / Stock History | Full stock and history for the selected shop | Other shops: quantity only by product |
| Add Products (Sales / Purchase) | Stock for the selected shop | Optional quantity hint for other shops |
Stock is never mixed across shops. Switching shop reloads product stock for the new shop.
Stock Transfer between shops
Menu: Inventory → Stock Transfer
Use this when stock must move from one shop to another before billing (for example stock is in Shop 1 but the sale must be in Shop 2).
| Step | Action |
|---|---|
| 1 | Open Inventory → Stock Transfer and click + New |
| 2 | Choose Shop From (source) and Shop To (destination) — they must be different |
| 3 | Set Transfer Date and save |
| 4 | On the transfer detail screen, search and add products; enter Transfer Qty for each line |
| 5 | Click Confirm Transfer — stock moves from Shop From to Shop To only at confirm time |
| 6 | After confirm, the transfer is locked (no edits). Switch to Shop To if needed, then create Sales / POS |
While Status is New, you can add products and change qty — stock does not move yet. On Confirm Transfer, the system checks source-shop stock and then posts the transfer. Confirmed transfers cannot be edited.
When adding products to a transfer, the Stock Available hint follows the shop selected in the top bar. For accurate qty, switch to Shop From before adding lines, or confirm stock in the product list for that shop.
Transfers involving the current shop appear in the Stock Transfer list (as source or destination). You can only choose shops assigned to your staff login.
Sales reports – Shop filter
Menu: Report → choose a sales report
Sales reports include a Shop multi-select in the filter bar (alongside dates, customer, and other filters).
| Behaviour | Detail |
|---|---|
| Options | Only shops assigned to the logged-in staff member |
| Default | The shop currently selected in the top bar |
| One shop | Report totals for that shop only |
| Several shops | Report combines the selected shops |
| Select all / clear | Use the Shop dropdown actions, then click Show Report |
Use this when you need a single-shop view or a combined view across branches without switching the top-bar shop for every run.
See also Reports.
Workflows
Open a second shop and give a staff member access
- Create the new shop under Admin → Shop (name, theme, billing address, and Address for printing).
- Open Admin → Staff and edit the staff member.
- Multi-select the shops they may use, including the new one.
- Set Default Shop (keep Shop 1 unless they mainly work in the new shop).
- Save. On next login they open their default shop; use Shop Switch to move between shops.
Day-to-day work in two shops
- Sign in (opens the default shop).
- Confirm the shop name and colour in the top bar.
- Work in Inventory / Sales / Purchase. Lists and stock are for that shop only.
- Click the shop chip or Switch Shop in the profile menu to move to the other shop (direct switch when there are exactly two shops).
Day-to-day work in more than two shops
- Sign in (opens the default shop).
- Click the shop chip or Switch Shop to open the shop list dialog.
- Select the shop to switch to.
- Lists, stock, and theme colour update to that shop.
Run a sales report for one or more shops
- Stay in any shop (or switch to the shop you use most).
- Open Report and choose a sales report (for example Sales Overview).
- In Shop, keep the default or select additional shops.
- Set dates and other filters, then click Show Report.
Validation rules
| Rule | Detail |
|---|---|
| Shop name | Required and unique |
| Theme | Required. One of 4 predefined themes — not a free-form colour |
| Staff shops | At least one shop must be assigned |
| Default shop | Required; must be one of the assigned shops |
| Existing users | Default to Shop 1 |
| Login | Opens default shop (or only assigned shop); no mandatory picker |
| Shop Switch (2 shops) | Direct switch to the other shop |
| Shop Switch (3+ shops) | Dialog with assigned shops only |
| Unpublished shop | Cannot be used in Shop Switch |
| Product stock | Working stock is always the currently selected shop; other shops show quantity only |
| Transaction lists | Show selected shop only; new documents belong to that shop |
| Sales reports | Shop filter: one or many assigned shops; default is the current shop |
| Print address | Per shop Address (for printing); separate from billing address |
Related pages
- User management — staff list, user group, and published status.
- User groups — roles and module permissions (shop access is in addition to group rights).
- Product — stock available and stock history follow the selected shop.
- Reports — sales reports with Shop multi-select filter.
- Settings — company print address (fallback when a shop has no print address).
- Login — credentials; multi-shop accounts open their default shop.
Summary
Create shops under Admin → Shop with theme, billing address, and Address for printing. Assign one or more shops to each staff member and set a default shop (Shop 1 for existing users). At login, staff enter their default shop. After login, the top bar shows the shop chip and colour. Shop Switch jumps to the other shop when there are two, or opens a dialog when there are more than two. Stock and transaction lists are always for the selected shop; other shops show stock quantity only. Use Inventory → Stock Transfer with Add Products (same style as Sales), then Confirm Transfer to move stock. Sales reports can include one or many shops via the Shop filter.